 click for larger
 I recently gave a talk to some young students and had to dig through my archives to find interesting things to show. This digital excavation unearthed quite a few clips, images and drawings that I don’t think have seen the light of day here, so I am starting a new series of ‘pastblast’ posts – showing older things that are still cool and trying to giving a little bit more background on the original project.
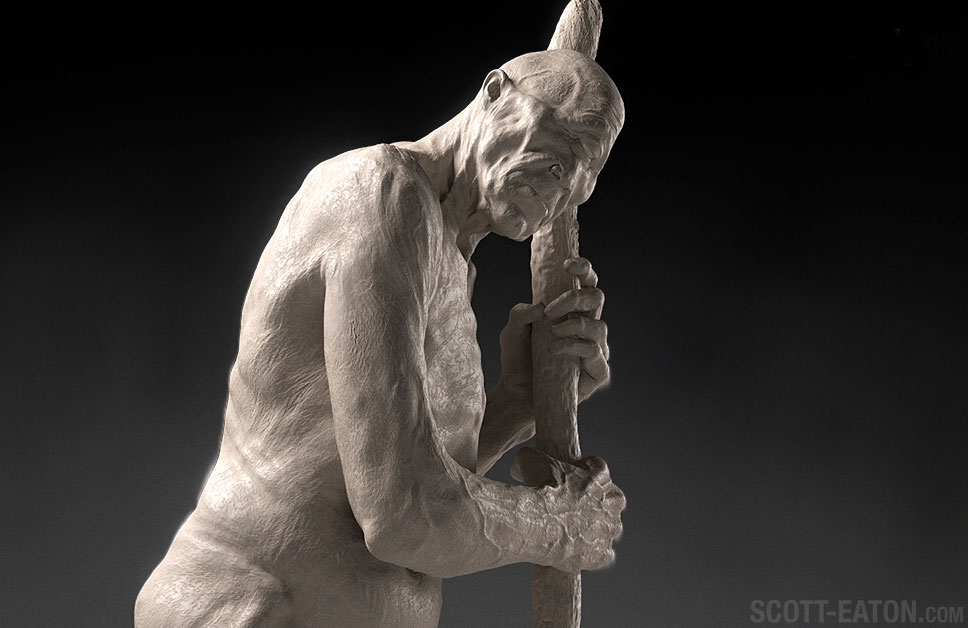
This old guy was an early character sculpt for the film Wrath of the Titans. The script called for three Cyclops – two brothers, and an aged father. Hopefully my design skills are at least good enough that you can tell this one is supposed to be the father!
Typically when I am developing a character, I try avoid the standard conventions for posing – a figure standing there with his arms out to the side. It is unnatural and conveys nothing of the ‘character’ of the character. Of course this ‘bind pose’ is a technical requirement further on in the process, but in the ‘make a interesting character’ stage, it is artistically counter-productive. Such was the case with the old man cyclops – he is defined by his frailty and reliance on his walking stick, the pose had to convey this. Beyond the posing, there had to be a quality to the anatomy that reinforced the age of the character – the cumulative effect of years of gravity on the skin, muscle atrophy, thinned skin with veins showing through, and lots of skeletal structure exposed.
As is the case with many concept sculpts, this one had to be done quickly. I think I turned this around in a day or so. This is where knowing your anatomy really helps because you are not guessing what should go where, but instead using your knowledge of anatomy to freely design the ‘pieces’ of the character. The cumulative effect of choosing the how, why and where of the anatomy should reinforce the intention of the design.
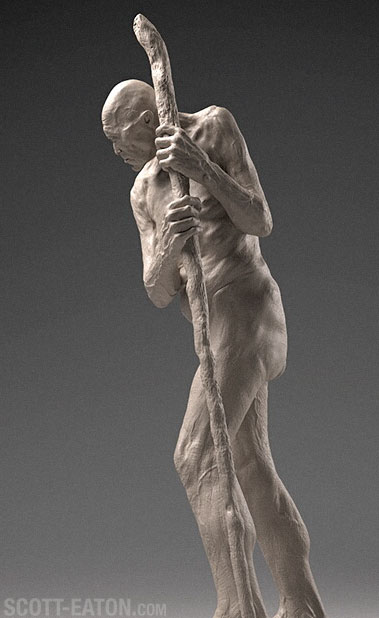
 For those of you who enjoy a bit of the nuts and bolts of the process – this guy was sculpted in ZBrush, my primary digital sculpting tool. He started from my standard, dumpy, base mesh, and was posed and proportioned quickly using transpose. I subdivide until I have a nice smooth working surface and then organically sculpt the surface at high resolution (my tools and techniques are all revealed in my digital figure sculpture course).
After a bunch of sculpting, trying my best to make things looks compelling and wonderful, I render a turntable or two (or perhaps 3d print an 18″ maquette if we are really trying to impress). At this point it is show-and-tell time. With any luck, the director likes the design and gives his blessing. If not, it is back to the drawing board, or at least iteration time. This old fella, however, hobbled his way through the approval process without any trouble.
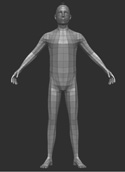
With the design approved the fun part is mostly over now and the technical process of getting the character into a riggable, animatable state begins. One of my dirty secrets is that I keep my poses stored on a layer, so when the time comes and the character gets approved, I can turn the ‘pose layer’ off and snap the character back to something approximating a bind pose very quickly. Of course there is quite a bit of reworking that goes on around the joints, but this is fast and reasonably easy to do. Regrettably the unposed character never looks as good as the original design, but this is all a necessary part of the process of bringing the character to life on screen.
the final, full-figure turntable